
A clear route to your first sale
Your five-step Elite Billing setup checklist
Complete your account and shared business defaults before creating invoices. This sequence helps the invoice editor start with the right business identity, currency, and tax configuration.
- Create your account with a sign-in mobile number, password, and business details.
- Confirm Business Settings, including your business name, address, currency, and timezone.
- Review Tax Settings and enter the rates that apply to your business.
- Add a product with its required name and selling price; enter opening stock if you track inventory.
- Create and save a sales invoice with customer details, items, tax, and payment information.
Step 1 · Signup
Create your Elite Billing account
Open the Elite Billing signup page and complete both sections of the form. All fields are required; signup asks for account information and the core details needed to create your business workspace.
Enter the account details you will use to sign in
- Enter your name and choose the country calling code and mobile number. The mobile number is used to sign in, so check it carefully before creating the account.
- Enter a password with at least six characters, then enter it again to confirm it.
Add the required business details
- Enter the business name, business email, and business address.
- Choose the label that fits the people your business serves: Customers, Patients, or Clients.
- Select the business currency and an initial tax preference. Changing currency also updates the suggested phone country code; check both before submitting.
- Select Create account. When signup succeeds, Elite Billing opens your workspace dashboard.
Step 2 · Business profile
Set up Business Settings
After signing in, open Settings and choose Business Settings. A business owner should review these shared details before employees begin creating customer-facing invoices.
Check your business profile and preferences
- Your Name, Business Email, and Business Name: check spelling and use the details your business wants associated with its workspace.
- Business Address: enter the address you want to maintain in the business profile.
- Business Currency: select the currency in which the business records and displays amounts.
- Business Timezone: select the timezone used by your business.
- Business Tax Registration Number: add the applicable GSTIN, VAT ID, TIN, EIN, ABN, or other registration number when relevant.
- Business Logo: upload a clear image if you want it on invoices. The page accepts image files up to 200 KB and scales the logo to fit within 200 × 200 pixels while keeping its proportions. PNG, JPG, or WebP are practical formats.
Save Business Settings and sign in again
Select Save & Log Out, confirm the prompt, and sign back in. The application logs you out so the updated business details can take effect. Keep your sign-in mobile number and password available.
Add bank details to your invoice, if needed
If your business currency is INR, open Settings → Bank Details. For a bank transfer, enter Bank Name, Account Number, IFSC Code and Branch. You can also add Account Name and an optional SWIFT Code (a valid 8- or 11-character BIC). If you start entering bank transfer details, the four core fields are required; Account Name and SWIFT Code are optional. Select Save Bank Details. These saved details can appear on invoice PDFs, including Standard Invoice. See the Bank Details guide for UPI and Google Pay options.
Step 3 · Tax defaults
Configure Tax Settings for your business
Open Settings, then Tax Settings. The selected tax type and rates become default values across billing modules, so choose and verify them before you issue invoices.
Choose the tax type that matches your setup
Select the preset that matches your business's tax setup. Each option adds a particular set of default tax fields, which you can then configure with your applicable rate or rates.
What each Tax Settings preset includes
- No Tax
- Leaves the default tax list empty.
- CGST / SGST
- Provides separate CGST and SGST/UTGST rate fields.
- CGST / SGST + CESS
- Provides CGST, SGST/UTGST, and CESS rate fields.
- IGST
- Provides one IGST rate field.
- IGST + CESS
- Provides IGST and CESS rate fields.
- CESS Only
- Provides one CESS rate field.
- VAT
- Provides one VAT rate field.
- Sales & Use Tax
- Provides one Sales Tax rate field.
- HST / PST / QST
- Provides separate HST, PST, and QST rate fields.
- SST
- Provides one SST rate field.
- JCT
- Provides one JCT rate field.
- IVA
- Provides one IVA rate field.
For the Indian GST presets, CGST / SGST represents split GST, while IGST is the single interstate GST option. Select a preset according to your actual tax treatment; do not choose one solely because it is the first option or appears on another business's invoice. If you are unsure, confirm the correct setup with a qualified tax professional.
Enter tax rates, discount, and service charge defaults
- After selecting a taxable preset, enter a rate for every tax field displayed. Each selected tax rate must be greater than zero before the settings can be saved.
- Enter Sales discount (%) only if you want a regular default discount in billing forms. You can review the discount on each invoice.
- Enter Service charge (%) only if your business applies one. A service charge is a separate billing value; do not treat it as a tax rate.
- If your business should not apply a tax by default, choose No Tax. Review each invoice before saving, especially if tax treatment varies by item or transaction.
- Select Save & Log Out, confirm, and sign in again so the new defaults can be applied.
Step 4 · Products & Services
Add your first product
Open Products & Services and select Add Product. Product Name and Selling Price are the required fields; other details can be added when they are useful for your business.
Enter the required product details
- Enter a clear Product Name that employees can find quickly while preparing an invoice.
- Enter its Selling Price in the selected business currency. Check the amount before saving, since this price is used when adding the product to an invoice.
- Select Add to create the product record.
Add stock and other optional product details
If you track inventory, enter Opening Stock Available For Sale when creating the product so the starting quantity is represented in the product record. A service or non-stock item may not need an opening quantity.
You can also add an average purchase price, description, category, HSN/SAC/HTS/HS code, barcode, and unit of measure. The average purchase price is cost information, not the selling price shown to customers. Use a unique barcode if you use barcode scanning.
Step 5 · Sales
Create and save your first sales invoice
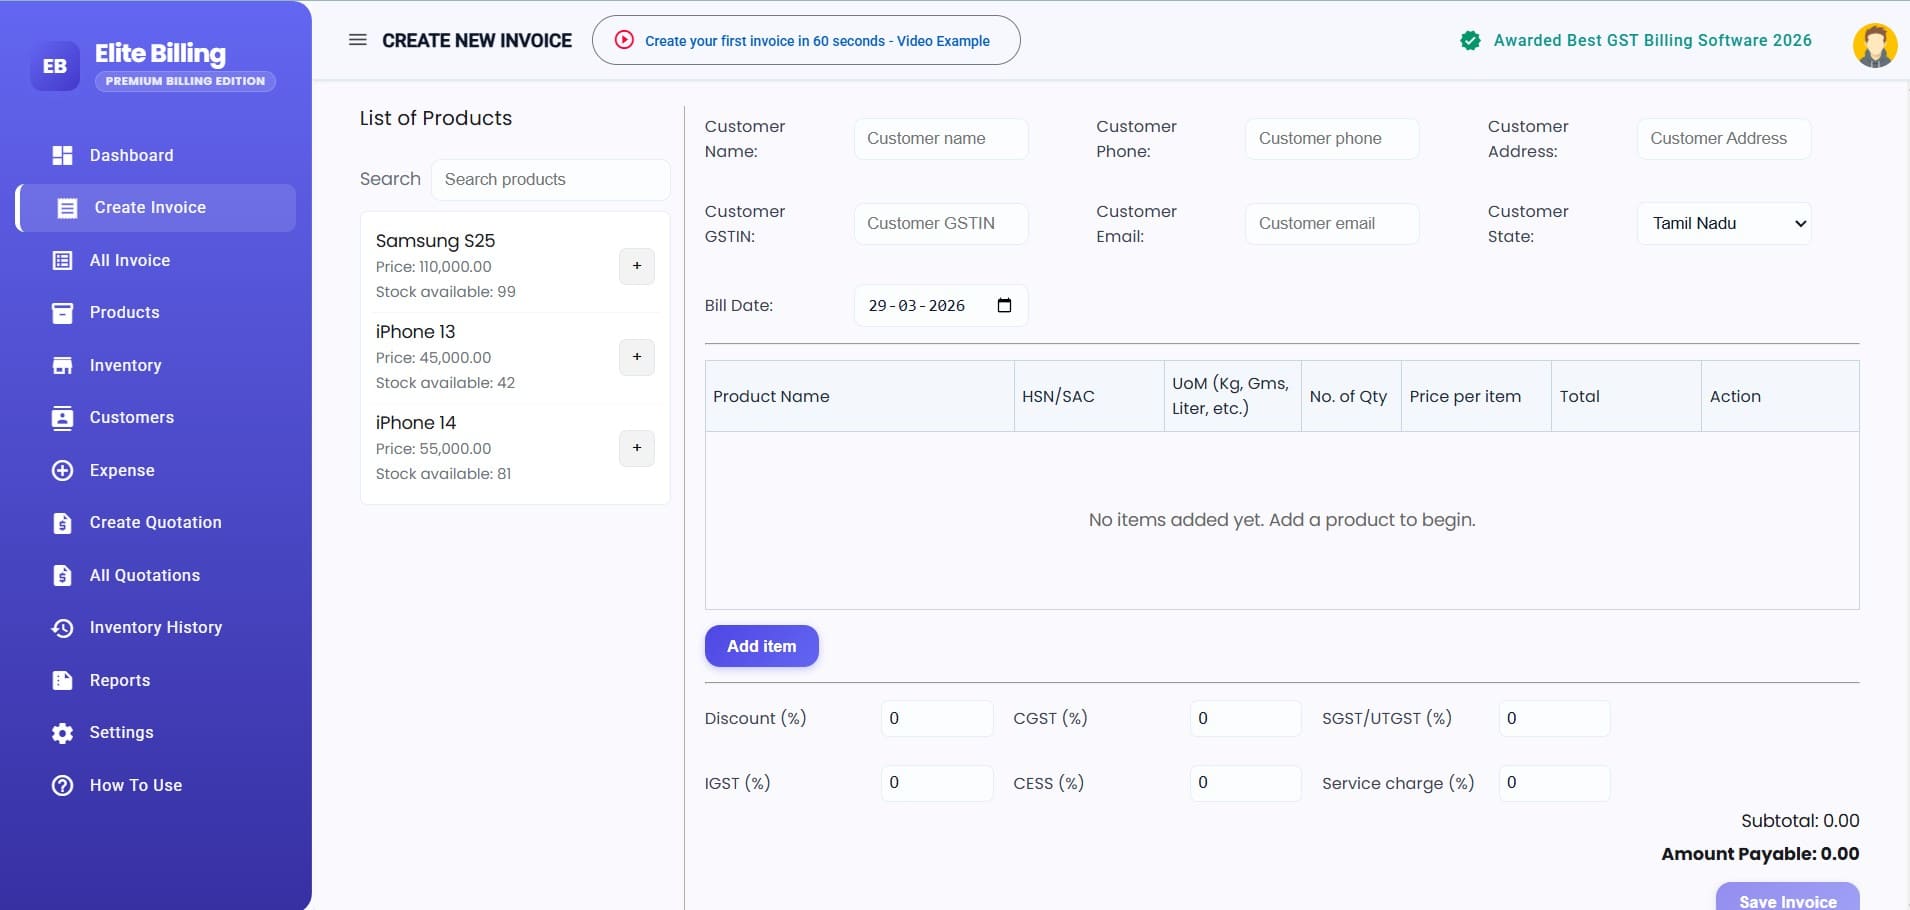
Open Sales Invoice from the sidebar and start a new invoice. The editor places customer fields and invoice items alongside a searchable product list, then shows the calculated totals before you save.
Add customer details and invoice items
- Enter or select the customer. Add the name and any contact, address, email, or tax registration details needed for this invoice.
- Search for a product in the product list and use its add control to put it on the invoice. You can also scan or enter a barcode, or add a line item manually when needed.
- Review each line item's description, quantity, and price. Confirm that the correct products and quantities are included.
- Check the invoice date and review the tax selection, discount, service charge, and amounts. The invoice editor shows the subtotal, tax breakdown, amount payable, received amount, and balance due.
Choose an invoice number
Leave Invoice Number (optional) blank to use the next number from your business settings, or enter a custom number. The defaults are the INV prefix, number-only format, and financial-year cycle. If you keep the default starting sequence, a new business's first automatically numbered invoice starts at INV-000001. You can change the three-letter prefix, format, reset cycle, or starting number in Settings → Invoice Settings → Invoice Numbering. See the full invoice numbering guide for details.
Review payment details and save
- Enter the amount received. If the received amount is greater than zero, choose a payment mode before saving. If the customer will pay later, review the received amount and balance due carefully.
- Confirm the final amount, then select Save Invoice. At least one invoice item is required.
- After a successful save, Elite Billing returns you to the Sales Invoice list. Open the saved invoice there to review its available view, edit, print, or share actions.
Download or Quick Print the saved invoice
From the Sales Invoice list, open Download PDF to choose Standard Invoice, Spreadsheet Invoice, Refreshing Invoice, Premium Invoice or Customer Invoice. Standard Invoice shows an HSN/SAC column when at least one item has a code other than empty, NA or N/A; otherwise, it omits that column and shows only quantity numbers. To use a preferred format for Quick Print, save it under Settings → Invoice Settings → Invoice Print Preference. This preference also applies to Quick Print for invoices from Appointments, Job Cards and Room Bookings. See the invoice print preference guide for details.
For what to do after saving, watch the Sales Invoice walkthrough for viewing, editing, and sharing saved invoices.
Quick-start FAQs
Common questions about getting started
Can I change my business details after signup?
Yes. Open Settings → Business Settings to update available profile details, currency, timezone, tax registration number, or logo. The business phone is read-only on that page.
Why do Business Settings and Tax Settings sign me out?
Both pages use Save & Log Out so updated business details or billing defaults can take effect. Confirm the prompt, then sign in again with your registered mobile number and password.
Do I need to enter opening stock for every product?
No. Enter opening stock when you want the product record to reflect the quantity currently available for sale. A service or item that you do not stock may not need an opening quantity.
Will Tax Settings apply to every invoice automatically?
The selected tax type and rates are business defaults across billing modules. Review the tax selection and calculated amounts on each invoice because the correct treatment can depend on the item and transaction.
Where can I find a sales invoice after saving it?
After a successful save, the app returns to the Sales Invoice list. Open the invoice from there to review it and use the available document actions.
Can I use or change a custom invoice number?
Yes. You can enter a custom number when creating an invoice or change the number in its edit form. The app does not check manually entered numbers for duplicates, so verify the number before saving. If you clear the number field while editing, the current number is kept. For automatic formats and sequence settings, see the invoice numbering guide.
Keep learning
Explore the full Elite Billing guide
Continue with detailed instructions for products, sales, purchases, service workflows, tools, settings, and plans.