
Elite Billing help centre · Products, Sales, Service, Banking, Tools, Settings and Plans
Elite Billing User Guide: GST Billing, Workflows and Settings
Learn product, sales, purchase, service and banking workflows; find records and review reports; configure business settings; and compare the annual premium plans.
Browse the guideNew to Elite Billing? Start with the five-step Quick Start guide.
Products & Services
What you can do on the Products page
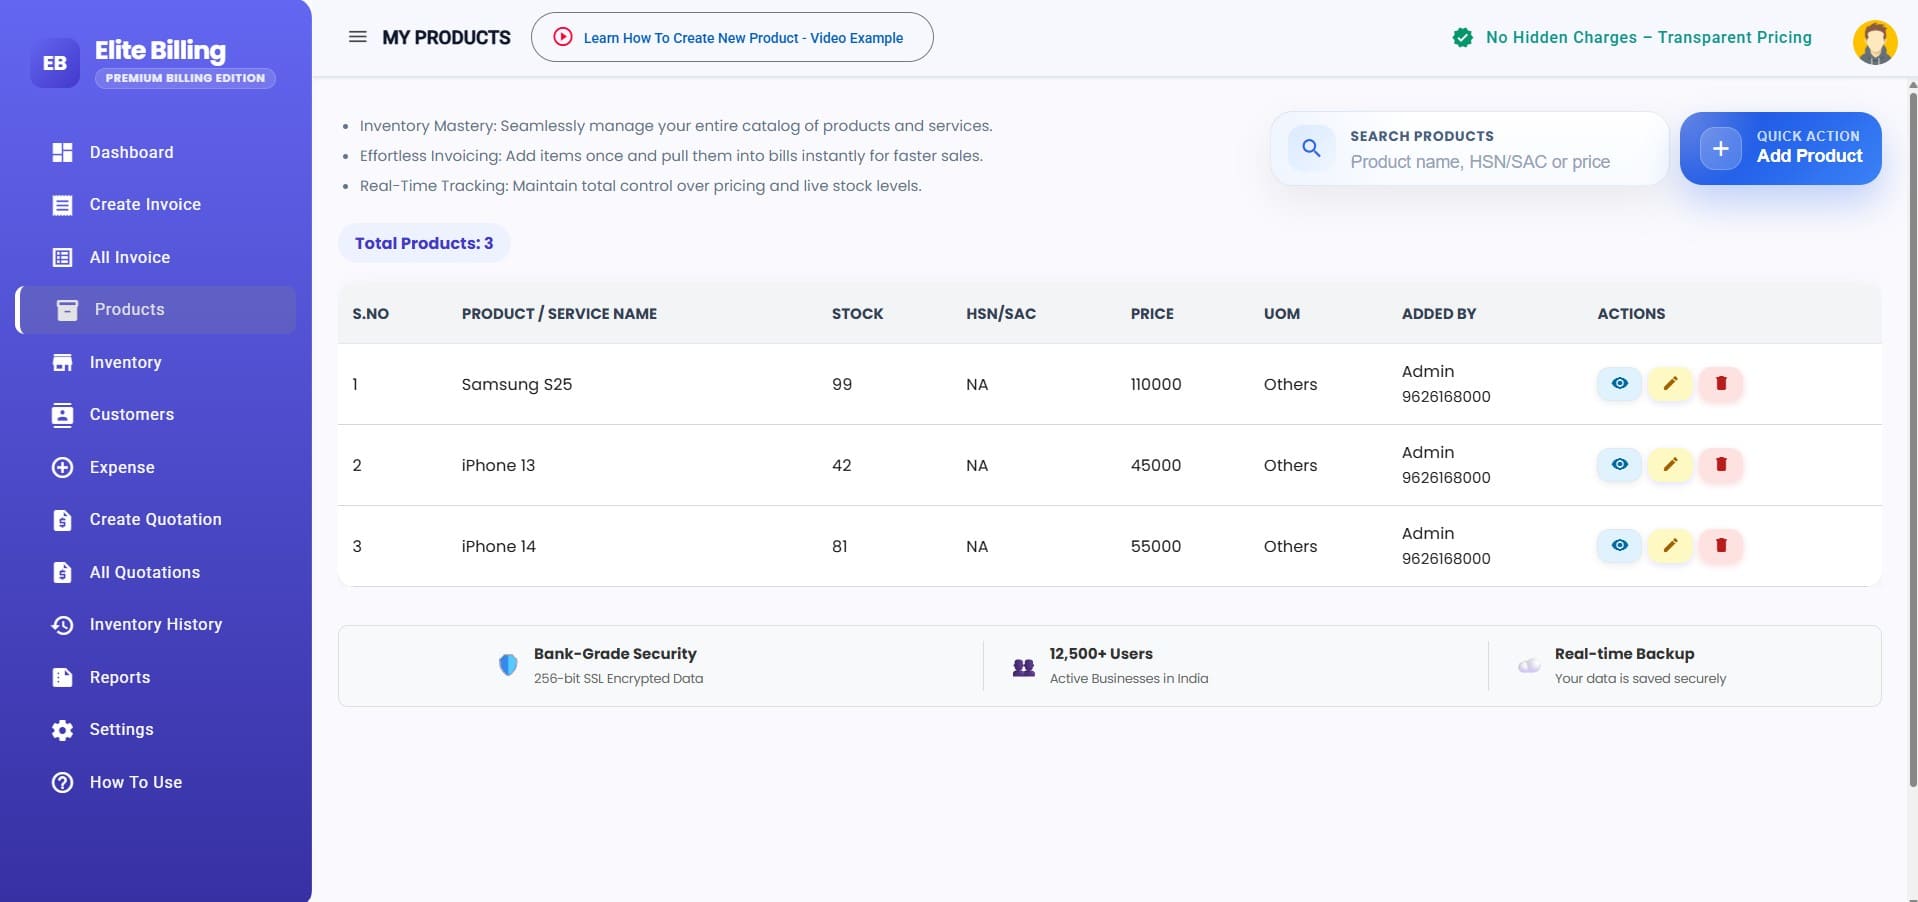
Use this page to maintain the products and services that appear in your billing workflow. The Page Notes panel gives a short reminder of the main tasks. You can search and filter the list, review product details, update product information, adjust stock, organize items into categories, or import many products from an Excel file.
Who can manage products? Business owners can add and edit products, adjust stock, manage categories, import products and delete products. Employees can view the product list and open a product summary by selecting its name. If you need a management action, ask your business owner for help.
Product setup
How to add a new product
- Open Products from the app sidebar.
- Select Add Product.
- Enter the Product Name and Selling Price. These are required. A product name can be up to 40 characters, and the selling price cannot be negative.
- Complete any optional details that help your business: opening stock, average purchase price, description, category, HSN/SAC/HS code, barcode and unit of measure.
- Select Add to save. The new product appears in the product list.
What each product field means
- Product Name
- The name used to identify the item. Required; maximum 40 characters.
- Selling Price
- The price used as the product’s selling price. Required and cannot be negative.
- Opening Stock Available For Sale
- Starting quantity on hand. Optional; enter zero or a positive whole number.
- Average Purchase Price per Item
- Optional purchase cost per item. Enter zero or a positive amount; it can include decimal values.
- Description
- Optional identifying details, such as model, size or variant.
- Category of the Product
- Optional grouping. Choose an existing category or create one with New Category.
- HSN/SAC/HTS/HS Code
- Optional classification code used by your business. If left blank, the product is saved with NA.
- Barcode
- Optional barcode value. It must be unique within your business.
- Unit of Measure
- Optional unit such as PCS, KGS, LTR or BOX. The default is Others; choose a suggestion or type a custom unit.
Barcode setup
How to enter or scan a product barcode
- In the product form, go to the Barcode field.
- Type the barcode, or focus the field and scan the product with a scanner that types into the active field like a keyboard.
- Save the product with Add or Update.
The barcode field is optional, but a barcode cannot already belong to another product in your business. If you see a duplicate-barcode error, check the other product and correct one of the barcode values before saving. The product search can also find matches by barcode.
Organize products
How to create, rename and delete product categories
Create a category from the product list
- Select the Manage Categories icon near the product filters.
- Enter a category name, then select Create Category. Names are required and can be up to 60 characters.
Create a category while adding a product
- Open Add Product and select New Category beside the category field.
- Enter the category name and save it. The newly created category is selected for the product automatically.
Rename or remove a category
In Manage Categories, choose the edit action to change a category name, then select Update Category. To remove a category, choose its delete action. A category assigned to products cannot be deleted; reassign those products first. Deleting a category does not delete its products.
Import many products
How to bulk import products from Excel
- Choose Bulk Add Products near the top of the Products page.
- Select Download Sample Excel and fill in the Products sheet. Keep the sample column headings in the file.
- Complete each product row. Product Name and Selling Price need values. Keep the Unit of Measure column in the sheet; an empty unit value defaults to Others.
- Select Upload File and choose an .xlsx or .xls file.
- Review the preview. Check the row status and any error message before importing.
- When rows are ready and no rows need attention, select Import Products.
Columns in the sample file
The template includes Product Name, Category, Selling Price, Average Purchase Price, Unit of Measure, Description, Barcode, HSN/SAC/HTS/HS Code and Opening Stock. Product Name, Selling Price and Unit of Measure headers must be present. Optional values can be left blank; blank stock defaults to zero and blank unit defaults to Others. Category names in the file are matched to existing categories or created during import. The workbook also includes a UnitOfMeasure sheet with suggested unit codes.
Fix import preview errors
- Product Name is required and must not exceed 40 characters.
- Selling Price must be present and numeric.
- Average Purchase Price and Opening Stock must be valid non-negative numbers.
- A barcode must be no longer than 64 characters and must be unique both in the uploaded file and in your business.
- Product names duplicated within the uploaded file are flagged for review.
If some rows fail after the server checks them, the preview marks those rows for attention. Correct the failed rows and upload a corrected file; do not include rows already marked as imported.
Find and arrange the list
How to search, filter, sort and browse products
- Search Products: Type a product name, barcode or category name. Search updates as you type. Select the clear icon to remove the search.
- Category: Choose All categories, Uncategorized or a specific category.
- Product count: The count beside the controls shows how many products match the current list query.
- Sort: Select Product Name, Category, Stock, Selling Price or Last Updated to sort by that column. Select it again to reverse the order. Last Updated starts with the most recently updated products.
- Pagination: The list shows up to 10 products per page. Use Prev and the next-page control below the table to move between pages.
Changing a search or category filter returns the list to its first page. If no rows match, the table displays No products found.
Product details
How to view or edit a product
View a quick product summary
Select a product name in the table to open its read-only summary. It shows the name, selling price, stock, average purchase price, description, category, barcode, HSN/SAC/HS code, unit of measure and who added the product. Select Close or click outside the dialog to return to the list.
Open the full product profile
Business owners can select the eye-shaped View Product Details action. The Details tab shows the product profile; Purchase History shows stock and cost entries. See Purchase history for details about the entries and which ones can be corrected.
Edit product details
- Select the pencil-shaped Edit Product Details action for the product.
- Update the name, selling price, description, category, HSN/SAC/HS code, barcode or unit of measure.
- Select Update to save, or Cancel to close without saving.
The edit form does not include opening stock or average purchase price fields. Use the row’s stock actions to change quantity, or use Purchase History to correct an eligible opening-stock or manual adjustment entry.
Inventory updates
How to add or remove product stock
Add stock
- Select the plus-shaped Add Stock action in the product row.
- Enter the whole-number quantity to add. The dialog previews the updated stock.
- Optionally enter the Purchase Price per Unit. Entering a purchase price updates the average purchase price.
- Select Add Stock to record the adjustment.
Remove stock
- Select the minus-shaped Remove Stock action.
- Enter the whole-number quantity to remove. Review the current stock, quantity to remove, average purchase price, value removed and remaining-stock preview.
- Select Remove Stock to record the adjustment.
Stock adjustments require a quantity greater than zero. You cannot remove more than the available stock. A manual removal is recorded as a stock adjustment using the current weighted-average purchase price; it is not a purchase invoice.
Cost and movement records
How to review purchase history and correct manual entries
Open a product’s full profile or edit form and select Purchase History. Each row shows the date, source, quantity, purchase price and total value. Use Previous or Next when there are more than 20 entries.
- Opening stock: Business owners can edit the opening-stock quantity and purchase price.
- Manual stock addition or removal: Business owners can correct the quantity and purchase price for a manual adjustment.
- Purchase invoice entry: This entry is linked to a purchase invoice and cannot be edited here. Correct it through the related purchase invoice.
To edit an available manual entry, select its edit action, change the quantity and/or price, then choose Save. The quantity must be greater than zero and the purchase price cannot be negative. Saving recalculates the average purchase price. Select Cancel to discard the edit.
Remove products
How to delete one product or all products
Delete one product
- Select the trash-shaped Delete Product action in that product’s row.
- Review the confirmation prompt, then confirm only if you intend to remove that product.
Delete all products
- Select the Bulk Delete Products icon near the filters.
- Read the confirmation prompt carefully. It says the action cannot be recovered.
- Confirm to delete all products for the business.
Troubleshooting
Common Products page questions
Why can’t I see Add Product, edit or stock buttons?
Employees can view products, while product management actions are available to business owners. Ask your business owner if you need one of these controls.
Why can’t I delete a category?
The category is still assigned to one or more products. Reassign those products to another category or set them to Uncategorized, then try again.
Why does my barcode not save?
Check that it is no longer than 64 characters and is not already assigned to another product in your business.
Why is a row in my Excel preview marked as an issue?
Read the error under its status. Check that required headers are present, Product Name and Selling Price have valid values, numeric fields are valid and non-negative, and barcodes and product names are not duplicated in the file.
Can I remove more stock than I have?
No. The page blocks a stock removal that would take available stock below zero.
Why can’t I change a purchase invoice row in Purchase History?
Purchase invoice entries must be corrected from the related purchase invoice. Business owners can edit opening-stock and manual adjustment rows in Product History.
Sales · Customer records
Manage customers and review purchase history
The customer page keeps contact information and sales history together. A customer record is also added automatically when a sales invoice is saved with a customer name and phone number, so you can begin billing before building a full contact list.
Add or update a customer
- Open the customer page from the Sales sidebar group. Select Add Customer to create a record, or the row’s edit action to update one.
- Enter the customer’s Name and Phone; both are required.
- Optionally add an email address, tax registration number, customer group, address and internal notes. Customer notes can be up to 1,000 characters.
- Select Save Customer. To leave without saving, select Cancel.
Find a record and open its history
- Search by name or phone number, or choose a group filter to narrow the list.
- Sort by Name, Phone, Total Bills, Total Spent or Group. The table shows each customer’s phone, bill count, total spent and group.
- Select a customer’s name or the history action to open purchase history. Use the view action for the saved contact details and notes. If loyalty features are enabled, the details also show points balance, available value and recent activity.
- Select Customer Report for customer activity, or Outstanding Report to review unpaid sales.
- The list displays up to 10 customers per page.
Organize customers into groups
Business owners can open Manage Customer Groups to create, rename or delete groups. A customer can belong to one group. A group can also have an optional special discount percentage; when you select a grouped customer in the invoice editor, that percentage is filled into the invoice discount field for review.
Import customer records in bulk
- Select Bulk Import, then download the sample Excel or CSV file.
- Keep the required Name and Mobile Number columns. Email, Tax Registration Number, Address and Group are optional.
- If you include a Group value, use the exact name of an existing customer group.
- Upload the completed .xlsx, .xls or .csv file and review the row preview and any issues before selecting Import Customers.
If the import reports rows that need attention, correct and reupload only those rows. Leave rows already marked as imported out of the corrected file.
Customer management actions
Business owners can add, edit and delete customer records, manage groups, import records and use bulk delete. Bulk delete removes all customer records for the business and the confirmation says it cannot be recovered, so read it carefully. Employees can search, view records and open purchase history; ask the business owner if a record needs to be changed.
Sales · Quotations
Create, share and convert a quotation
Use a quotation to give a customer a price estimate before creating a sales invoice. Quotations have their own number and date, and can be reviewed or shared from the quotation list.
Create a quotation
- Open Quotations in the Sales sidebar group and select Create Quotation.
- Enter a customer name or phone number and choose a matching saved customer if one appears. Add or review the phone, address, tax registration number and email.
- Find products in the product panel or scan a barcode, then add the items to the quotation. Review each item’s name, quantity and rate; you can add or remove rows.
- Choose the applicable tax settings and review the discount, service charge and total. Add internal notes if useful; these notes do not appear on the quotation PDF.
- Select Save Quotation. At least one item is required.
Search and review quotations
Search by quotation number or customer name, and use the month selector to filter the list. Sort by Date, Quotation, Customer or Amount. Each row shows the date, quotation number, customer, phone and total. The page displays up to 10 quotations at a time. Business owners can use Bulk Delete Quotations to remove all quotations; its confirmation says the action cannot be recovered.
Use the quotation actions
- View: open the quotation details.
- Edit or delete: business owners can edit or delete a quotation while it has not been converted into an invoice.
- Download: choose a PDF layout from Standard Quotation, Spreadsheet Quotation, Refreshing Quotation, Premium Quotation or Customer Quotation. The menu offers the same layout choices as Sales Invoices, with quotation wording and details.
- Share: prepare the quotation for email, or use the WhatsApp action to prepare a PDF link and message. The WhatsApp action asks you to review its sharing notice first.
- Convert to Sales Invoice: create an invoice from the quotation when it is ready. A canceled quotation or one already converted cannot be converted again.
Sales · Invoices
Create sales invoices and track payments
Create a sales invoice when you record a completed sale. Saving an invoice automatically deducts its product quantities from stock. The invoice list then gives you a place to check sales totals, payment progress and invoice status.
Create a sales invoice
- Open Sales Invoice in the Sales sidebar group and select Create Sales Invoice. You can also convert an eligible quotation into an invoice.
- Enter a customer name or phone number and select a saved customer when available. Review the contact details and bill date.
- Search the product list or scan a barcode, then add products to the invoice. Review item names, quantities and rates; adjust or remove a line if needed.
- Choose tax settings and review any discount, service charge or available loyalty redemption. Check the amount payable before continuing.
- Enter the amount received and select a payment mode if payment has been collected. The available modes are Cash, UPI, Card, Bank Transfer, Cheque and Other. The balance due is shown with the invoice total.
- Add internal notes for the business if needed; these notes do not appear on the invoice PDF. Select Save Invoice. At least one item is required.
Use a manual invoice number
When creating a sales invoice directly, the Invoice Number (optional) field lets you enter your own number. Leave it blank to have Elite Billing assign the next number using your business numbering settings, or enter a custom value to use that value for this invoice. Manually entered numbers are not checked against other invoices for duplicates. Check that the number is correct and has not already been used before saving.
When editing an invoice, its current number appears in the Invoice Number field. Enter a replacement and select Update Invoice to change it. If you clear the field, the current number is kept. Changing the default numbering settings does not rename existing invoices; edit an invoice to change its number individually.
Filter and review the invoice list
- Choose a month, filter by invoice status (All, Active or Cancelled / Returned), and filter by payment status (All, Paid or Unpaid).
- Search by bill number, customer name or phone. Sort by Date, Bill No, Customer, Amount, Payment or Status.
- The list shows the invoice amount, amount received, any balance due, payment state and active or canceled/returned status. Select a linked customer name to open purchase history.
- The summary panel includes sales, received and unpaid amounts, invoice count and paid/unpaid counts for the selected period. The list displays up to 10 invoices at a time.
- Business owners can open the Sales Report and Invoice Print Preference shortcuts above the list.
View, update, share or print an invoice
- View: open the invoice details. Business owners can also edit or delete an invoice.
- Update received amount: use the more-actions menu to change the amount received and payment mode. The amount is limited to the invoice total; the payment state reflects whether the amount is unpaid, partial or paid.
- Cancel / Return: only a business owner can cancel or return an invoice, or undo that status change. Users do not see these controls. Canceling restores the stock for the invoice items; undoing the cancellation deducts those quantities again.
- Download PDF: choose a format for this invoice, including Standard Invoice, Spreadsheet Invoice, Refreshing Invoice, Premium Invoice and Customer Invoice. Standard Invoice includes the HSN/SAC column when at least one line item has a code other than NA or N/A. Otherwise, it leaves out that column and shows only the quantity number.
- Quick Print or thermal receipt: Quick Print uses the format saved in Invoice Print Preference. You can also choose a thermal preview at 80 mm or 58 mm.
- Share: prepare the invoice for email or use the WhatsApp action to prepare a PDF link and message. Review the WhatsApp sharing notice before continuing.
Sales · Delivery Challan
Prepare delivery paperwork from a sales invoice
A delivery challan records the goods and delivery recipient associated with a sales invoice. It copies the invoice details into a separate document and can include an optional shipping label. It does not let you change the invoice items.
Create a delivery challan
- Open Delivery Challan in the Sales sidebar group and select Create Delivery Challan.
- Search for a sales invoice by bill number, customer name or phone number. Enter at least two characters, then select an invoice that has not been canceled or returned.
- Review the invoice number, bill amount, Bill To details and copied items. The item names, quantities, rates and taxes come from the invoice and cannot be changed in the challan.
- Set the Challan Date; it defaults to today. Under Ship To, enter or update the recipient name, phone and delivery address. Bill To remains the customer details from the invoice.
- Optionally expand Shipping Label and enter courier, service, AWB/tracking number, order number, payment type, collectable amount, parcel weight and dimensions, shipping charges, platform fee, routing codes and a label note. If left blank, the order number uses the challan number.
- Select Create Delivery Challan. The app assigns a challan number using the April-to-March financial year, for example
DC/26-27/00001. A paid invoice defaults to Prepaid with no amount to collect; an unpaid balance defaults to COD with the remaining amount filled in. Review these shipping-label values before saving if they need to differ.
Review and manage challans
- Find a challan: choose a month and optionally filter by Prepaid or Cash on delivery. Search by challan number, invoice number, customer name or phone. The list shows the challan date and number, linked invoice number, customer and bill amount; it displays 10 records per page.
- View or edit: open the saved challan to review it. Editing can update the Ship To and shipping-label details; the linked invoice items and challan date are not editable.
- View, download or print the challan PDF: open the PDF preview, or choose Original or Duplicate when downloading or printing.
- Print a shipping label: use the label action to prepare a separate parcel label with recipient and shipping details.
- Delete: only business owners can delete a challan. Users do not see the delete control; deletion does not delete the linked sales invoice.
Sales help
Common questions about customers, quotations, invoices and delivery challans
Do I need to create a customer before making an invoice?
No. Enter the customer’s name and phone number while creating the invoice. The customer record is added automatically when you save it.
Can a quotation become a sales invoice?
Yes. Use Convert to Sales Invoice on a quotation that is not canceled and has not already been converted.
Why did my product stock change after saving an invoice?
Sales invoices deduct the quantities of their items from product stock. Canceling or returning an invoice restores those quantities; undoing the cancellation deducts them again.
Can I create a delivery challan without an invoice?
No. Create the challan from an existing sales invoice that has not been canceled or returned.
Can I edit invoice items on a delivery challan?
No. The item details, quantities, rates and taxes are copied from the sales invoice and are locked. You can enter separate Ship To details and optional shipping-label information.
Who can delete a delivery challan?
Only a business owner can delete a delivery challan. Users can view and update its delivery and shipping-label details, but they do not have the delete control.
Will internal notes appear on a quotation or invoice PDF?
No. Internal notes are for business use and are excluded from the quotation and invoice PDFs.
Who can change customer records or invoice details?
Business owners can manage customer records and groups, and can edit or delete sales invoices. Users can view customer and invoice information and use the available sales workflow actions. Ask the business owner if you need a management change.
Can I use a custom sales invoice number?
Yes. Enter one when creating an invoice or change the number in the edit form. The app does not check manually entered numbers for duplicates, so you are responsible for using the correct number and checking that it has not already been used. If you leave the edit field blank, the existing number is kept.
Purchases · Suppliers
Manage suppliers and review purchase history
The Suppliers page stores contact details and helps you review purchases linked to each supplier. A supplier record is also added automatically when you save a purchase invoice with a supplier name and phone number.
Add or update a supplier
- Open Suppliers from the Purchases sidebar group. Select Add Supplier, or choose a supplier’s edit action.
- Enter the supplier’s Name and Phone; both are required.
- Optionally add an email address, tax registration number, address and internal supplier notes. The tax registration number accepts up to 15 characters; notes can be up to 1,000 characters.
- Select Save Supplier. Select Cancel to close without saving.
Search, sort and open purchase history
- Search by supplier name or phone number.
- Sort by Name, Phone, Total Purchases, Total Amount or Last Updated. The list shows those details with supplier actions.
- Select a supplier’s name or the history action to open purchase history. Use the view action to read saved contact details and notes.
- Select Supplier Report to review supplier activity. The list displays up to 10 suppliers per page.
Import supplier records
- Select Bulk Import, then download the sample Excel or CSV template.
- Keep the required Name and Phone Number columns. Email, Tax Registration Number and Address are optional.
- Upload the completed .xlsx, .xls or .csv file and review the preview, row status and any errors.
- Fix rows that need attention before importing. If some rows fail during import, use the error messages to correct and upload only those rows; leave rows already marked as imported out of the retry file.
Business owners can add, edit and delete supplier records. They can also use bulk delete to remove all suppliers for the business; the confirmation says the deletion cannot be recovered. Employees can view supplier information and purchase history. The Supplier Report and Bulk Import controls are also available on this page.
Purchases · Expenses
Record and review business expenses
Use Expenses for business costs that you want to record and total over time. Each entry can include a vendor, reference invoice number and itemized amounts, with tax and other charge settings when needed.
Add an expense
- Open Expenses in the Purchases sidebar group and select Add Expense.
- Enter any vendor name, vendor phone, tax registration number and invoice number that help identify the cost. Choose the expense date and add optional notes.
- Add one or more item rows. Enter an item name, optional description, quantity and rate; the row amount is calculated from quantity and rate. Add or remove rows as needed.
- Use the tax controls to select applicable taxes and review any discount, service charge and the total expense.
- Select Save Expense. When editing an existing expense, select Update Expense. The expense date is locked after the record is created.
Find and review expenses
- Choose a month and search by invoice number, vendor or phone.
- Sort by Date, Invoice Number, Vendor, Expense Amount or Logged By. The table shows the date, invoice reference, vendor, total expense and who recorded it.
- Use Expense Report for a report. The summary alternates between page notes and a view of this month’s expense total compared with the previous month.
- Select the view action to open an expense. Business owners can also edit or delete an individual record. The list displays up to 10 expenses per page.
Business owners can bulk delete all expense records. Read the confirmation carefully; it warns that all saved expense details will be deleted. Employees can add and view expenses available to them; ask the business owner if an existing record needs to be edited or removed.
Purchases · Purchase Invoice
Create purchase invoices and track amounts payable
Use Purchase Invoice to record products and supplies bought from a supplier. Saving a purchase invoice increases stock for products already in your product list, while the invoice records the supplier, purchase amount and payment progress.
Create a purchase invoice
- Open Purchase Invoice in the Purchases sidebar group and select Create Purchase Invoice.
- Enter a supplier name or phone number and choose a matching saved supplier if one appears. The supplier’s saved phone, address, tax registration number and email fill into the form; review or complete those details.
- Set the bill date, then find products in the product panel or scan a barcode and add them to the invoice. Adjust product names, quantities and rates, add or remove rows, or select Bulk Upload via Excel to import line items.
- For an Excel line-item upload, download the sample file and keep the required Product Name, No. of Quantity and Price per Item columns. Product names must already exist in Products & Services. Review the preview and fix any invalid rows before importing.
- Choose purchase tax settings and review the subtotal, discount, taxes, service charge and total payable.
- Enter the amount paid and payment mode if a payment has been made. The available modes are Cash, UPI, Card, Bank Transfer, Cheque and Other; the remaining balance is shown as Balance Payable.
- Add optional internal notes for the business and select Save Invoice. At least one item is required.
Filter and review purchase invoices
- Choose a month, filter by payment status (All, Paid or Unpaid), and search by bill number, supplier name or phone.
- Sort by Date, Bill No, Supplier, Amount, Billed By or Payment. Each row shows the invoice amount, who recorded it, amount paid and any balance payable.
- The summary shows purchase invoice totals and paid/unpaid amounts and counts for the selected period. The list displays up to 10 invoices at a time.
- Select Purchase Report to review purchase totals. Select a linked supplier name to open supplier purchase history.
Use the purchase invoice actions
- View: open the saved purchase invoice details.
- Edit or delete: business owners can edit or delete an individual purchase invoice.
- Download: download a PDF copy of the purchase invoice.
- Update Paid Amount: record a payment against the invoice, select its payment mode and review the remaining balance. The amount cannot exceed the invoice total.
- Bulk Delete: business owners can delete all purchase invoices. The confirmation says the action cannot be recovered.
Employees can create and view purchase invoices, download PDFs and update paid amounts. Business owners can also edit and delete individual invoices or bulk delete all purchase invoices.
Purchases help
Common questions about suppliers, expenses and purchases
Will saving a purchase invoice update product stock?
Yes. Saving a purchase invoice increases stock for its linked products that already exist in Products & Services.
What is the difference between an expense and a purchase invoice?
Use Expenses to record business costs as expense entries. Use Purchase Invoice to record supplier purchases of catalog products and track the stock added by those purchases.
Can I upload purchase invoice items from a spreadsheet?
Yes. Choose Bulk Upload via Excel in the item table, download the sample and use product names that already exist in Products & Services.
What happens to stock if I delete a purchase invoice?
The stock quantities recorded by that purchase invoice are removed from stock when the invoice is deleted. Bulk deletion also removes the purchase invoices and their recorded stock movements.
Who can edit or delete purchase records?
Business owners can edit or delete supplier and expense records, and edit or delete purchase invoices. Employees can use the viewing and recording actions available on these pages. Ask the business owner if you need a management change.
Service · Appointments
How to schedule and manage appointments in Elite Billing
Use Appointments to plan a customer service visit, keep its contact and timing details together, and follow it through to completion. The list can be filtered by month and status, and searched by customer, purpose or appointment number.
Create an appointment
- Open Appointments under the Service sidebar group and select New Appointment.
- Enter the customer name and phone number. You can also add an email address, address and the employee assigned to the appointment.
- Describe the work in Purpose / Service and enter an Expected Amount. Add notes if they will help prepare for the visit.
- Set the appointment date and time, choose a status such as Scheduled or Confirmed, and save.
The date is locked after an appointment is created; the time and other editable details can be updated. The form also has a Reminder Time field for recording reminder timing. Treat that field as appointment information; it does not confirm that a message or notification was sent.
Track, complete and bill an appointment
- Use the month selector and status filter to narrow the list. Search by customer, purpose or appointment number, then sort by schedule, customer, amount or status.
- Review the expected amount alongside the invoice amount. A converted appointment shows its linked sales invoice.
- When the visit is finished, select Mark Complete or update the status to Completed. Then use Convert to Sales Invoice if the work should be billed.
- Only a completed appointment that has not already been converted can create an invoice. After conversion, open or print the linked invoice from the appointment row.
Users can create, view and update appointments. Only business owners can delete an individual appointment or use bulk delete; deleted appointments cannot be recovered.
Service · Job Cards
How to create a job card and track repair work
A Job Card records a service or repair intake, the customer’s device details, the reported issue and progress through the work. Add any parts and labor estimate to keep the expected charge with the job before preparing a sales invoice.
Create a job card
- Open Job Cards in the Service sidebar group and select New Job Card.
- Enter the customer name and phone number. Add contact details and an expected delivery date if needed.
- Choose a device type and record its brand or model, serial number or IMEI, and physical condition.
- Describe the reported issue and add technician observations or internal notes to help track the work.
- In Parts & Labor, add product parts or use Manual Entry. Enter the item, quantity and rate, then add any rough estimated cost, tax or service charge that applies.
- Review the system-generated final estimate and save the job card.
Update a job card and create its invoice
- Choose a month and status, or search by customer name, phone or job card number. Sort the list by intake date, job card number, customer, invoice or status; it shows the estimate beside any converted invoice amount.
- Use the status filter to find Pending, In Progress, Awaiting Parts, Completed or Cancelled work. Update the repair notes, parts, estimate or status as the work progresses.
- When work is finished, mark the job card Completed. Select Convert to Sales Invoice to prepare the bill from the completed job.
- After conversion, use the linked sales invoice and print action. A converted job card is locked from editing; its linked invoice must be handled from Sales Invoices.
Users can create, view and update job cards that have not been converted. Only business owners can delete an unconverted job card or use bulk delete. Converted Job Cards cannot be deleted. Review the confirmation carefully because deleted records cannot be recovered. The list also shows estimate and invoice amounts to help track job value.
Service · Room Bookings
How to manage rooms, reservations and payments
Room Bookings combines room setup, reservation records, live availability, payments and reporting in one page. Start by adding the rooms that can be booked, then use the status board and booking list to manage each stay.
Set up rooms and check availability
- Open Room Bookings from the Service sidebar group and select the Rooms tab.
- Select Add Room and enter a room number, capacity and standard rate. Room name, type, floor and description are optional.
- Use Import Rooms for a spreadsheet with the sample column headings. Review the preview for duplicate room numbers or invalid rows before importing; use Export Rooms to download the room list.
- Open Room Status and choose a date to see rooms marked Available, Booked, Under Maintenance or Inactive. Only active rooms available for the selected booking dates can be selected for a new reservation.
Create and update a room booking
- Open the Bookings tab and select New Booking.
- Select an available room, enter the customer name and phone, and set check-in and check-out date and time. Check-out must be later than check-in.
- Enter the guest count and review the rate, discount and total. Record any advance payment, special request or internal note, then save.
- Use the date, status and search filters to find bookings. The list shows each booking’s room, guest, stay dates, status, total and amount paid.
- Use Payments to record another payment. The payment panel keeps a history and shows the outstanding balance; available methods include cash, card, UPI, bank transfer and other.
- When the guest leaves, select Mark as Checked Out. A sales invoice can be created from a booking only after it is checked out and fully paid.
Block maintenance and review reports
- In Maintenance, select Block Room, choose a room and enter the start and end times. A room cannot be booked during an active maintenance block. Only a business owner can remove a maintenance block.
- Booking Report lists bookings for a selected month and can be exported to Excel.
- Income Report summarizes bookings, cancellations, no-shows, revenue and outstanding amounts for a date range, with room-wise performance and Excel export.
Users can create and update bookings, record payments and mark a booking as checked out. Only business owners can delete bookings or rooms. A room with current or future bookings cannot be deleted; resolve those bookings before deleting the room.
Service help
Common questions about appointments, job cards and room bookings
Can I create a sales invoice from an appointment?
Yes. Mark the appointment as Completed, then select Convert to Sales Invoice. Each appointment can be converted once; use its linked invoice after conversion.
When can a job card be converted to a sales invoice?
After the job card is marked Completed. Once converted, the job card is locked from editing and the linked invoice is available from the job card list.
Why can’t I convert a room booking into an invoice?
The booking must be marked Checked Out and the recorded payments must cover the full booking total before invoice conversion is enabled.
Why is a room unavailable for a booking?
It may already have a booking during the requested dates, have a maintenance block that overlaps the stay, or be inactive. Review the selected dates in Room Status and check the room’s status.
Does the appointment Reminder Time send a notification?
The appointment form records a reminder time. The field by itself does not confirm that an email, text or other notification was sent.
Who can delete service records?
Only business owners can delete appointments, bookings, rooms or unconverted Job Cards, or remove maintenance blocks. Converted Job Cards cannot be deleted. Users can continue to create, view and update records through the available workflows.
Banking · Bank Accounts
Add and manage bank account details
Use Bank Accounts to save the details of the accounts you want to track. Select Add Bank Account, enter an account name, currency, opening balance and opening date, then save. Bank name, account holder, account type, account number, branch, branch address, IFSC, SWIFT/BIC and notes are available for any additional details you want to keep.
The account list shows the opening and current balances; the current balance reflects the opening balance and transactions recorded in Banking. Account numbers are masked in the list. Use the view action to review saved details, the edit action to update an account, or delete when the account has no transactions. The list displays up to 10 accounts per page.
Banking · Bank Transfers
Manually record deposits, withdrawals and transfers
Select Add Transaction on the Bank Transfers page to manually record a deposit, withdrawal or bank transfer. Enter the date, amount and any reference or notes that will help you find the record later.
- Deposit: choose the account receiving the money.
- Withdrawal: choose the account the money is leaving.
- Between my accounts: choose both your own accounts. The transfer is added to one account and deducted from the other.
- Send to someone else: choose your account, then enter the recipient’s name. Optional bank details can also be saved.
- Receive from someone else: choose your account, then enter the sender’s name. Optional bank details can also be saved.
For transfers involving someone else, only your selected account balance changes. Use the search, month, type and account filters to find records. Sort by date, type, account, reference or amount; the table displays up to 10 records per page. View, edit or delete a transaction from its row actions.
Banking help
Common questions about Banking
Does Banking connect to my bank?
No. Banking is for details and transactions that you enter manually for your internal records.
Do banking records update invoices or expenses?
No. Banking records are separate and do not change sales invoices, purchase invoices or expenses.
Who can use Banking?
Only the business owner can access the Banking pages.
How do the three transfer options work?
Between my accounts updates both of your accounts. Send to someone else and Receive from someone else update only the account you select for your business; the other person’s account is kept as counterparty information.
Tools · Advanced Search
How to search invoices and records across Elite Billing
Advanced Search looks across several modules from one screen, so you can find a record when you know part of its name, phone number, reference or amount. Use it to locate the right record, then open that record’s module for its available actions.
Search across modules
- Open Advanced Search under Tools.
- Enter a customer or supplier name, mobile number, invoice or quotation number, product, appointment or job card detail, expense vendor, or a numeric invoice or expense amount.
- Select Search or press Enter. Search begins in All modules for the currently selected month and year.
- Use the Module, Year and Month filters to narrow the results. Changing a filter refreshes the search.
- Choose a page size of 10, 20 or 50 results, then use Previous and Next to browse.
Results show the module, reference, name, phone, amount, date, status and a short description when those details apply. They are summaries rather than direct record actions; use the module shown on the result to view or update the record.
If nothing matches, check the selected month and year, switch the module filter to All modules, try a shorter search term or correct the spelling. Select the clear icon to reset the search and date filters to the current month.
Tools · Reports
How to find sales, inventory and GST reports
Reports opens a catalogue of report cards. Choose a card to open its focused report page; that page provides its own filters and any download or export actions available for that report.
Choose a report by task
- Sales, purchases and expenses: open Sales Report, Purchase Report, Expense Report or Profit Report for totals and trends.
- Products and inventory: download the product register; review product sales, product profit, category sales, or a product’s invoice-wise buy and sale movement.
- Customer and supplier activity: review customer purchase totals, unpaid or partly paid customer bills, and supplier purchase totals.
- GST: open the GSTR-1 Summary, Sales GST Liability, GSTR-3B Summary or HSN/SAC/HTS/HS Code Report.
- Employee sales: where available, compare invoice counts and sales value by employee.
Report cards and sections can vary with account access. Follow the filters shown on the selected report page, check the selected date range or month, and use its download or Excel control when one is provided.
Tools · Analytics / Performance
How to review yearly sales and business performance
The yearly Analytics page brings sales, purchases, expenses, invoice volume and profit figures together. Open Analytics or Performance under Tools, then select a year to refresh the summary.
Read the annual summary and charts
- Year Summary: view Sales, Purchases, Expenses, Gross Profit, Net Profit and invoice count for the selected year.
- Gross Profit: the page describes this as sales minus purchases. Net Profit is shown as gross profit minus expenses.
- Visual Trends: compare invoice sales per month and invoice count per month in the two charts.
- Monthly Analytics: compare each month’s invoice count, sales, purchases, expenses, gross profit and net profit in the table.
If the page displays an analytics rebuild notice, some recent monthly figures may still be updating. Recheck the yearly view after the notice clears.
Tools help
Common questions about Advanced Search and Reports
Why can’t I find a record in Advanced Search?
Advanced Search is limited to the selected month and year. Check those filters, switch the module to All modules, and try the record number, customer or supplier name, phone number, or a shorter term.
Can I open or edit a record from an Advanced Search result?
The result is a summary that helps identify the matching module and reference. Open that module from the sidebar to use its view, edit or payment actions.
Does Advanced Search include room bookings?
Not at present. Search for a room booking from the Bookings tab in Room Bookings using its date, status, booking number, customer, phone or room.
Why is the sidebar item called Performance instead of Analytics?
Both labels open the yearly Analytics page. The name shown can vary with the account view.
Why might recent yearly figures still be updating?
If an analytics rebuild notice appears, the page indicates that recent monthly data is still being refreshed. Check the view again after the notice clears.
Why don’t I see the same report cards as another employee?
Available reports can differ with account access. Use the cards shown in your Reports page or open the report from its related app page.
Business Settings
How to set up your business profile
Business Settings holds the main details used to identify your business in Elite Billing. Review these details before you create invoices, especially the business name, address, currency and timezone.
- Open Settings from the sidebar and select Business Settings.
- Review your name, business email, business name and address. The business phone is displayed here but cannot be edited on this page.
- Choose the business currency and timezone that match your operations. Add the business tax registration number if applicable.
- Upload a clear business logo if you want it to appear on invoices. Keep the image at or below 200 KB; the page scales it to fit within 200 × 200 pixels.
- Select Save & Log Out, confirm the prompt, then sign in again to continue with the updated business details.
Business Settings
How to choose tax and billing defaults
Tax Settings lets the business select its tax structure and default rates, along with a sales discount and service charge percentage. The selected tax type and rates are used as defaults across billing modules.
- Open Settings and choose Tax Settings.
- Select the tax structure used by your business. Options include No Tax, CGST/SGST, CGST/SGST + CESS, IGST, IGST + CESS, CESS Only, VAT, Sales & Use Tax, HST/PST/QST, SST, JCT and IVA.
- Enter a rate for each tax field shown. For a selected tax setup, the displayed rates must be greater than zero.
- Enter the default Sales Discount (%) or Service Charge (%) if your business uses them. These values cannot be negative.
- Review each value, then select Save & Log Out and confirm. Sign in again to return to the app.
Business Settings
How to add bank or UPI details
The Bank Details card is available when the business currency is INR. Open Settings → Bank Details to add a UPI ID, a 10-digit Google Pay number, bank transfer details, or both. For a bank transfer, enter Bank Name, Account Number, IFSC Code and Branch. You can also enter Account Name and an optional SWIFT Code. If you enter any bank transfer field, the four core bank fields are required; Account Name and SWIFT Code remain optional. A SWIFT Code, when supplied, must be a valid 8- or 11-character BIC. Select Save Bank Details. Saved bank details, including Account Name and SWIFT Code when provided, appear on supported invoice PDFs, including Standard Invoice, Spreadsheet Invoice and Refreshing Invoice.
Tools and configurations
How to manage shared notes, customer terminology, and loyalty rewards
These tools help keep the app aligned with how your team works: Internal Notes for a shared business note, People You Serve for the customer label shown throughout the app, and Loyalty Points for customer rewards.
Internal Notes
Open Internal Notes, select Edit, enter or update the note, then choose Save Note. The note can contain up to 2,000 characters. The page displays when it was last changed and by whom. Everyone in the business can view, edit and save this note, so do not put passwords or other private credentials in it.
People You Serve
Open People You Serve and choose Customers, Patients or Clients. The selected term updates the relationship wording across the app and can be changed later.
Set up customer loyalty points
Open Loyalty Points to enable rewards, set the spend threshold and points earned, then set the currency value of each point. The earning calculation uses the amount after discounts and excludes tax and service charges. A customer earns points for each complete spend threshold; leftover spend below the next complete threshold does not carry forward. Redeemed amounts do not earn points.
- New settings apply to new invoices; previous invoices do not receive rewards retroactively.
- Turning loyalty points off keeps existing point balances and history.
- After loyalty points have been used on an invoice, the value assigned to each point becomes fixed.
Invoice Settings
How to configure invoice numbering and appearance
Invoice Settings controls the sales invoice number format and year cycle, the default print style and shared Terms & Conditions, and the optional signature shown on supported invoice PDFs.
Configure automatic invoice numbering
Open Settings, go to Invoice Settings, and select Invoice Numbering. These business-wide settings control the format and year cycle used for automatically assigned sales invoice numbers. The default is the INV prefix, Option 1: Number only, and the Financial year cycle. Examples below use the default prefix.
- Option 1: Number only shows a six-digit serial without a year, for example
INV-000013. - Option 2: Year + Number includes the selected year cycle and the same six-digit serial. With the financial year cycle, an example is
INV/26-27/000013; with the calendar year cycle, an example isINV/2027/000013.
Choose when the serial restarts: Financial year (1 April to 31 March) restarts at 000001 on 1 April, while Calendar year (1 January to 31 December) restarts at 000001 on 1 January. The year shown in Option 2 follows this selected cycle.
Both display formats use the same serial sequence within the selected year cycle. Switching between the formats changes how a number is displayed; it does not create a separate counter. A new year cycle starts a new sequence. These automatic numbering choices apply to new sales invoices, including invoices created from bookings, appointments, job cards and quotations. Changing settings does not rename previously issued invoices.
Choose the next invoice number
The Choose the next invoice number section shows the next automatic number for the current year cycle and previews how it will look in your selected format. You can start at a higher value when beginning to use Elite Billing, or move a saved next number up or down. The next number must stay above the highest invoice number currently in the list for that year cycle. For example, if the highest remaining invoice number is 66, you can choose 67 or higher. If you set the next number to 1002 and then delete that invoice while 66 is the highest remaining number, you can lower the next number to 67. A deleted invoice number can be used again. The serial supports values from 000001 through 999999.
Choose the format, year cycle and next number, then select Save settings once to save the numbering settings together. The next-number setting controls automatically assigned numbers; it does not prevent you from entering a custom number on an individual invoice.
Choose your invoice prefix
Set a prefix of exactly three letters from A to Z, such as ABC. It is saved in uppercase for your business, so entering abc produces ABC-000013 in Option 1, ABC/26-27/000013 in the financial-year format, or ABC/2027/000013 in the calendar-year format. The prefix applies to automatically generated sales invoice numbers in both formats. Changing it does not restart the sequence or rename existing invoices. A number manually entered on an invoice is not automatically rewritten to use this prefix.
Choose an invoice print preference
Open Settings → Invoice Settings → Invoice Print Preference to choose the default format for Quick Print. If no preference has been saved, the app uses Spreadsheet Invoice (A4). The saved preference also applies when quick printing invoices from Sales Invoices, Appointments, Job Cards and Room Bookings. In the Sales Invoice Download PDF menu, you can choose a format for an individual invoice regardless of the saved preference.
- A4 styles: Standard Invoice, Spreadsheet Invoice, Refreshing Invoice, Premium Invoice and Customer Invoice. The print preference page shows (A4) beside these styles; the Download PDF menu omits that suffix.
- Standard Invoice HSN/SAC column: the PDF adds this column when at least one item has a real HSN/SAC code. Empty, NA and N/A codes do not count. When the column is shown, quantity units appear below the quantity numbers; otherwise, only the numbers appear.
- Thermal Receipt: choose a paper width of 80 mm or 58 mm when you select this style.
- Round off the invoice total: choose Yes or No. When enabled, rounding applies to the total and received amount on fully paid sales invoice PDFs. Partially paid invoices keep their exact amounts.
- Terms & Conditions: enter one line of up to 270 characters, using letters, numbers, spaces and basic punctuation. The saved text is shared across the business and appears on sales invoice PDFs. Select Restore default terms to bring back the supplied text, then select Save preferences.
Add a signature to invoice PDFs
Upload a PNG, JPEG or WebP signature image no larger than 600 × 240 pixels or 300 KB. A white background is recommended. Preview it, select Save Signature, and check a Standard Invoice, Spreadsheet Invoice or Refreshing Invoice. If no signature is saved, Spreadsheet Invoice and Refreshing Invoice show a generated note; Standard Invoice keeps its authorized signature label. You can remove the uploaded signature from this page.
Employee Settings
How to manage employee accounts, attendance, and salary
Business owners can use Employee Settings to maintain employee accounts, configure salary profiles, and review attendance. Keep each employee’s contact details current so the employee can use their own sign-in.
Create or update an employee account
- Open Employee Management and select Create User.
- Enter the employee name, mobile number with country code and a password. A new password must have at least six characters.
- Select Create to save. To change an existing employee’s details, choose its edit action and save the updated information.
When editing an existing account, leave the password field blank if you do not want to change its current password. Business owners can also remove an employee account when it is no longer needed.
Record and review attendance
Open Attendance, choose a month and date, and use the employee search or status filter to find the right entry. Select the employee’s daily status, such as Present, Week Off, Leave or Half Day. Use Attendance Rules to choose the week-off days, and the month summary to review the selected period.
Set up employee salary
Open Salary to set each employee’s monthly salary, effective date and payment mode, then select Save on that employee’s row. Available payment modes are Cash, Bank Transfer, UPI and Cheque. Salary is calculated based on attendance, and at the end of the month it is added to the Expenses page automatically.
Security Settings
How to change a password and sign out other devices
Use the account security options to update a password or end app sessions on devices you no longer use. These controls are useful when you change devices or want to review where the account is signed in.
Change your password
- Open Change Password.
- Enter the current password, then enter and confirm the new password. It must contain at least six characters.
- Save the change and sign in again with the new password.
Choose a strong password that you do not reuse for another service, and do not share it with other people.
Review active sessions
Open Active Sessions and refresh the list to review signed-in devices and recent activity. Use the sign-out action beside another device, or select Sign Out Other Devices to end all other sessions. To end the session on the device you are using, sign out through the app as usual.
Settings help
Frequently asked questions about Elite Billing Settings
Where should I start when setting up a new business?
Open Settings and review Business Settings first. Confirm the business name, address, currency and timezone, then select the appropriate tax defaults and review invoice print preferences.
Why does saving Business Settings or Tax Settings sign me out?
Those pages use Save & Log Out so the updated business details or defaults can be applied. Confirm the prompt, then sign in again.
Does the tax setup become the default in billing?
Yes. The selected tax structure and rates are used as defaults across billing modules. Check that the selected setup and rates are correct for your business before saving.
Why can’t I see Bank Details?
The Bank Details card is shown when the business currency is INR. Review the currency under Business Settings if the card is missing.
Where do I choose the invoice layout used for quick printing?
Open Invoice Print Preference and save a default style. Thermal receipts also require a paper width of 80 mm or 58 mm.
Do invoice numbering changes update existing invoices?
No. Changing the format, year cycle or next automatic number does not rename existing invoices. If you need to change one invoice number, edit that invoice and update its Invoice Number field.
Where do bank details and a signature appear?
Saved bank details appear on supported invoice PDFs, including Standard Invoice, Spreadsheet Invoice and Refreshing Invoice. The saved signature is also used on those formats. Preview your chosen format after saving to check the placement.
Can every employee change shared business settings?
Available Settings cards depend on account access. Business owners manage shared business and invoice defaults; employees can use the options available to their account.
Who can read the Internal Notes content?
It is a shared business note that everyone in the business can view and edit. Use it for practical team information, not passwords or private credentials.
How are loyalty points calculated?
Points are calculated on eligible spend after discounts and exclude tax and service charges. Each complete threshold earns points; remaining spend below the next threshold does not carry forward.
Does turning off loyalty points remove existing customer balances?
No. Disabling the feature keeps the existing point balances and history. New settings apply to new invoices; earlier invoices are not updated retroactively.
Subscription
Which premium plan fits your business?
The two paid plans keep the same core billing features and include live support. Choose between them based on how many employee accounts your business needs. Both are annual plans with a one-time payment; the Subscription page states that they do not auto-renew.
Review or change a subscription
- Business owners can open Subscription from the sidebar to review the current plan, status and payment history.
- Select Upgrade plan or Manage plan to view the available options.
- Choose the plan that matches your employee account needs. Review the displayed price, account limit and annual billing cycle.
- Continue to payment. The app shows the selected plan and amount for review before checkout; the subscription activates after successful payment.
Premium plan questions
Do the two premium plans include different billing features?
The core billing features are the same. Both premium plans add live support; the Team Plan raises the employee account limit from 5 to 25.
Will an annual premium plan renew automatically?
No. The Subscription page describes the annual purchase as a one-time payment with no auto-renewal.
Where can I confirm the latest price and terms?
Review the plan cards in Subscription and the current pricing page before completing a purchase.
Continue learning
Start quickly or compare plans
New to Elite Billing? Follow the account, setup, product, and first-invoice checklist. You can also review the latest annual plan pricing and terms.
Read the Quick Start guide View plans and pricing